Tracking is the key to any successful marketing plan. It’s what allows us to see what is working and what isn’t – and make adjustments accordingly. At the core, it’s important to set clear, measurable goals, so you can tell how well your marketing efforts are performing against specific areas you are interested in.
When it comes to analytics on the digital side of marketing, few tools compare to Google Analytics in its ability to monitor website conversions and to provide actionable insights – to ultimately maximize lead conversions and sales down the line. But, to get high quality insights, sometimes you need to put in a little bit of work!
One strategy to get the most of your Google Analytics data is to set up form submissions as conversion goals, to more closely monitor how your website is driving leads to reach out. How do we do it? Easy – a custom Marketo form code is used to fire customer event triggers within Google Tag Manager (GTM), which then triggers a conversion/goal in Google Analytics.
Interested in setting this up? Below, we will take you through a step-by-step guide, to get you off on the right foot.
While the instructions below are a basic guide to set up one Conversion Goal, Google Analytics allows a much more robust system, with up to 20 goals per report view! We can also set up separate Event Tags for different pages, to see which page performs the best – or even modify conversion goals to track e-commerce site purchases or session duration. The sky’s the limit!
Step 1: Create a Marketo Form Event Listener Tag
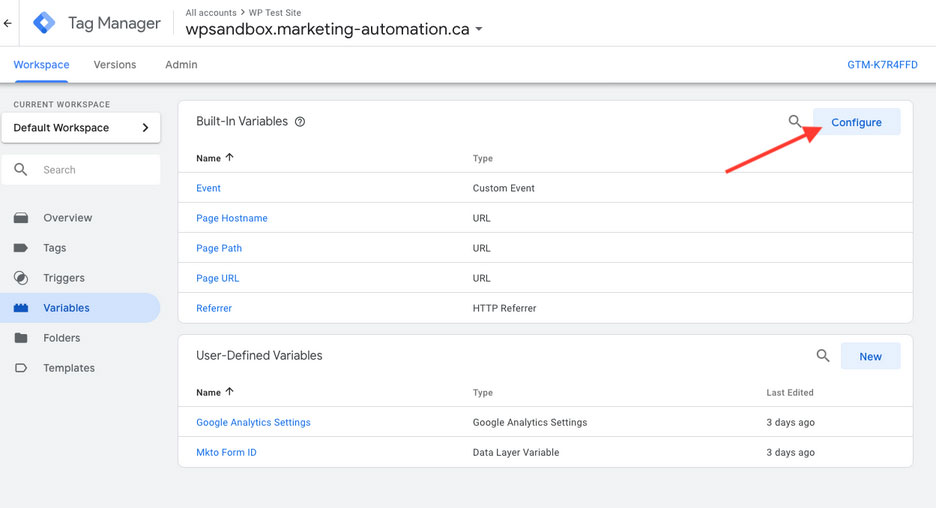
First things first, enable the “Event Variable”; this will be your selection for “Tag Type” when creating your tag:
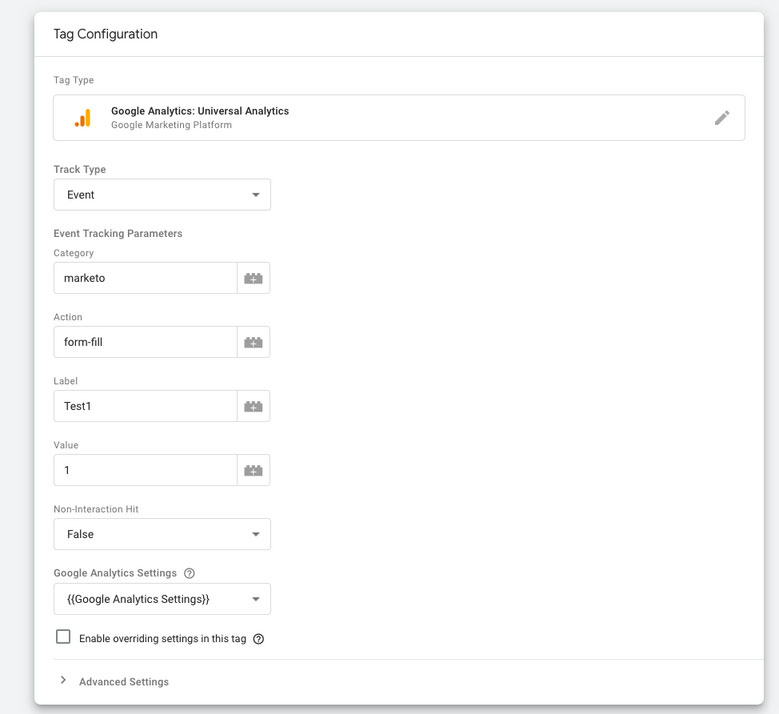
Then, create an “Event Tag”, which will be set up to pass information to Google Analytics when a form is filled out on the website. The “Event Tracking Parameters” help to differentiate between different events (for example, a form fill vs. a click). Long story short, this step will allow us to pair the “Google Analytics Conversion Goal”(set up in Step 3) to the “Event”.
The “Event Tag” makes reference to a variable called “Google Analytics Settings” which is a common variable found in GTM that represents the User ID (UID) for Google Analytics. If the variable hasn’t been created yet, you can easily create it by following these steps.
Step 2: Create a New Custom Event Trigger
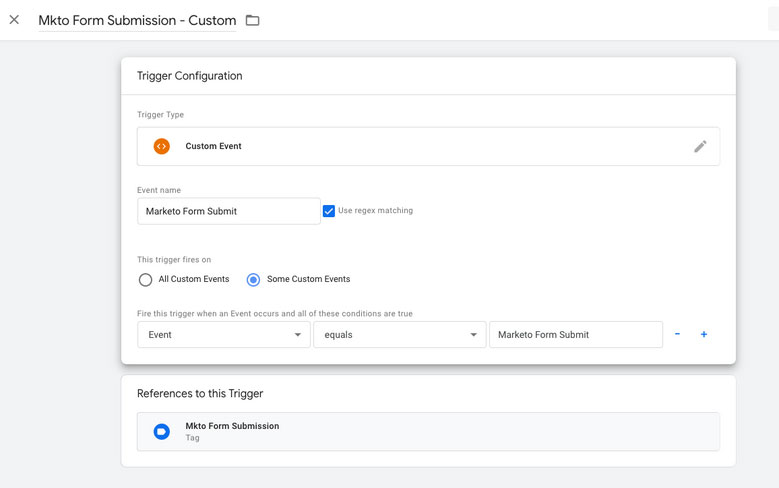
We are halfway there! What next? The next step is to create a new custom “Event Trigger”. If your forms are hosted in Marketo, make sure to use the “Custom” event type here rather than a “Form Fill” event type. This is because GTM is expecting a POST to trigger the Form Fill event type, but Marketo’s forms are submitted via the forms 2.0 API and not the POST method – so “Form Fill” event types won’t work.
Make sure the “Event Name” here matches the value within the form code snippet you’ll be adding to the website (see Step 4). If you decide to change the “Event Name”, always make sure to update the code snippet as well. Also, don’t forget to check the “Use regex matching” box (the “Event Name” gets passed from the code snippet as a regex-string).
Check out the image below, which shows the “Mkto Form Submission” tag is associated with the trigger.
Step 3: Create a Custom Event Goal in Google Analytics
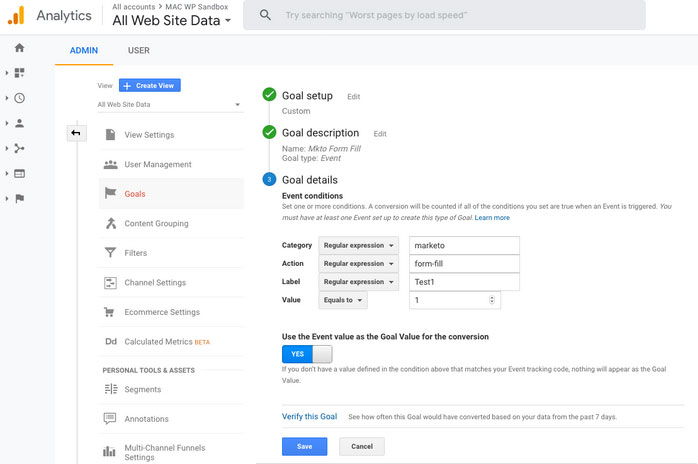
Now the main task starts. The next step is to create a “Custom Event Goal” in Google Analytics, in order to match the event created in GTM to a Goal in Google Analytics. It is important in this step to ensure the Goal details match with the “Event Parameters” established in the GTM tag (Step 1).
Step 4: Marketo Form Code Snippet
This is the last step and the most important one: adding the code snippet to your website. Ideally, use GTM, so the code is added to ALL pages at once. Don’t forget to replace the highlighted values with the specifics from your Marketo instance/Event trigger set up (Step 2)!
<script>
MktoForms2.loadForm
("your.marketoinstancehere", "Munchkin Code", Your Form ID,
(function(form) {
form.onSuccess
(function
(values, followUpUrl)
{dataLayer.push({'event': 'Marketo Form Submit'})}
)})
);
</script>
<script>
MktoForms2.whenReady(function (form){
   form.onSuccess(function(values, followUpUrl){
    dataLayer.push({'event': 'Marketo Form Submit'})
  });
});

</script>
And voila! Test out your new Google Event Goal set up!
If you got stuck along the way, or are interested in developing a more robust Conversion Goal system, please do not hesitate to contact us to speak with one of our experts about how we can help get you set up.